Setting up an IAM with Auth0
Learn how to configure and run the NPL Engine with Auth0 as your Identity and Access Management (IAM) provider.
Prerequisites
Before starting this guide, you should have:
- Completed Developing NPL on your own machine with the engine in development mode
- Completed Using your NPL application
- An Auth0 account (free tier is sufficient for development)
- Basic understanding of OAuth 2.0 and OpenID Connect (OIDC) concepts
- Docker Compose installed
- NPL CLI installed
Why Auth0?
Auth0 is a fully managed identity platform that provides:
- Production-grade authentication and authorization
- User management with support for social logins, enterprise SSO, and multi-factor authentication
- Compliance with security standards and regulations
- Scalability and reliability for production workloads
While the NPL Engine's development mode includes an embedded OIDC server, Auth0 (or another IAM provider) is essential for production deployments.
Warning
The ENGINE_DEV_MODE embedded OIDC is for development only. Never use it in production environments.
Setting up Auth0
Creating an Auth0 Application
- Log in to your Auth0 Dashboard
- Navigate to Applications > Applications in the sidebar
- Click Create Application
- Configure your application:
- Name:
NPL Engine(or your name of choice) - Application Type: Single Page Application or Regular Web Application (depending on your frontend)
- Name:
- Click Create
Creating an API
If needed:
- Navigate to Applications > APIs in the sidebar
- Click Create API
- Configure your API:
- Name:
NOUMENA API(or your name of choice) - Identifier:
https://api.noumena.local(or your name of choice) - JWT Token Profile:
Auth0 - JWT Token signing algorithm:
RS256
- Name:
- Click Create
You should keep the identifier at hand as you will need it for the configuration of the NPL CLI. If you wish, you may instead set this API as the default audience under Settings > General > API Authorization Settings.
Configuring Application Settings
Once your application is created:
- Go to the Settings tab of your application
- Note the following values (you'll need them later):
- Domain: Your Auth0 domain (e.g.,
your-tenant.us.auth0.com) - Client ID: Your application's client ID
- Client secret: Your application's client secret
- Domain: Your Auth0 domain (e.g.,
- Under Advanced Settings > Grant Types:
- make sure Refresh Token, Client Credentials, and Password are selected
- Save your settings
- Under your application's APIs panel (next to
Credentials):Editthe API you want to give access to, and set User Access toAuthorized
Configuring Custom Claims
Auth0 uses custom claims to add additional user information to JWT tokens. The NPL Engine uses these claims to identify parties in protocols.
- Go to Actions > Library
- Create a new Action:
- Select a Custom Action
- Triggers:
Login / Post Login
- Click Save: you'll be directed to the screen of your Action
- Add custom claims to your access tokens:
exports.onExecutePostLogin = async (event, api) => {
  api.accessToken.setCustomClaim("email", event.user.email);
  api.accessToken.setCustomClaim("username", event.user.nickname);
  api.accessToken.setCustomClaim("preferred_username", event.user.nickname);
};- Click on Deploy
- Go to Actions > Triggers >
post-login -
Drag and drop your trigger (from the list of the right) to the spot in between Start and Complete
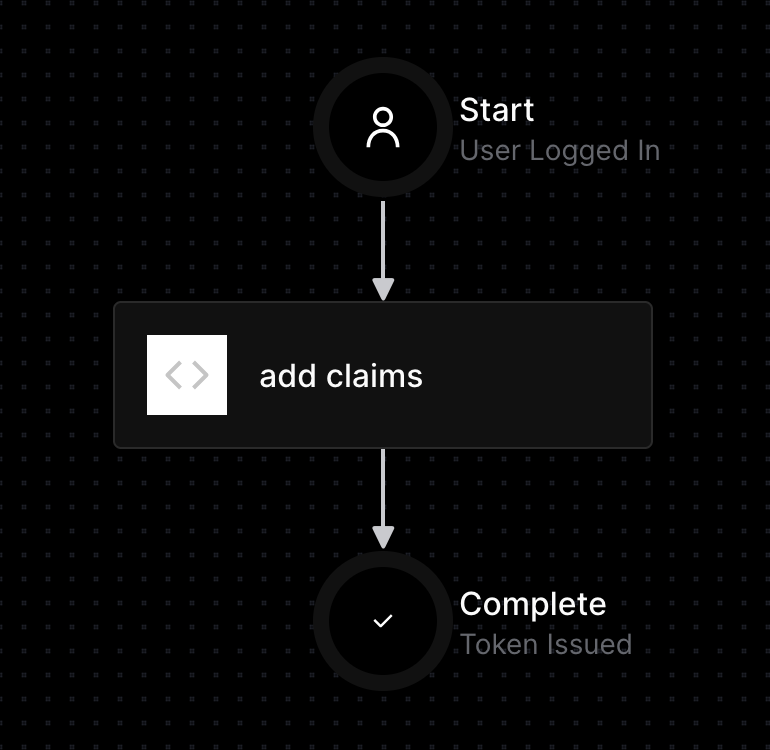
-
Click Apply to save the flow
Your custom claims will now be included in all JWT tokens issued after a successful login. You can verify this by decoding a JWT token at jwt.io and checking the token payload.
Creating Test Users
- Navigate to User Management > Users in the Auth0 Dashboard
- Click Create User
- Fill in the user details:
- Email:
alice@example.com - Password: Choose a secure password
- Connection:
Username-Password-Authentication(default)
- Email:
- Click Create
- Repeat for additional test users (e.g.,
bob@example.com,carol@example.com) - Go to Settings > API Authorization Settings and set Default Directory to
Username-Password-Authentication - (Optional) Set a default audience -- if set, it will be included in the requests and won't be needed in your
npl.ymlconfiguration file
Configuring the NPL Engine with Auth0
Docker Compose Configuration
Update your docker-compose.yml to configure the engine with Auth0. Remove or set ENGINE_DEV_MODE: false to disable
the embedded OIDC server, and set up your IAM.
services:
  postgres:
    image: postgres:14.13-alpine
    ports:
      - "5432:5432"
    environment:
      POSTGRES_PASSWORD: postgres

  engine:
    build: .
    ports:
      - "11000:11000"
      - "12000:12000"
      - "12400:12400"
      - "12700:12700"
    depends_on:
      - postgres
    environment:
      ENGINE_ALLOWED_ISSUERS: https://your-tenant.us.auth0.com/
      ENGINE_MANAGEMENT_HOST: 0.0.0.0
      ENGINE_DB_URL: jdbc:postgresql://postgres:5432/postgres
      ENGINE_DB_USER: postgres
      ENGINE_DB_PASSWORD: postgres
      ENGINE_OIDC_ISSUER_URI: https://your-tenant.us.auth0.com
NPL.yml Configuration
Update your npl.yml to configure the proper parameters needed for the correct handling of requests. Your local
section should be like this:
local: # Configuration for deploying to a local NOUMENA Engine instance
  managementUrl: http://localhost:12400
  username: alice@example.com
  password: <the password of your user>
  authUrl: https://<your-tenant>.us.auth0.com
  clientId: <your-client-id>
  clientSecret: <your-client-secret>
  audience: https://api.<your-api>.local
Note that if you have configured a default audience in your Auth0 settings the audience is not needed.
Running the Engine with Auth0
Starting the Services
Start your engine with:
docker compose up -d --waitCheck that the engine is running correctly:
curl http://localhost:12000/actuator/healthYou should see a response indicating the engine is healthy:
{
  "status": "UP"
}
Deploying NPL using the NPL CLI
When deploying your NPL application to production:
If you reached this point of the setup, you are finally ready to deploy your application to your local docker instance. In order to do this, simply run:
npl deployTroubleshooting
JWT Token Validation Fails
Problem: The engine rejects JWT tokens with "Invalid issuer" or "Token validation failed"
Solution: Verify that:
ENGINE_ALLOWED_ISSUERSexactly matches theissclaim in your JWT token- The trailing slash in the issuer URL matches (e.g.,
https://your-tenant.us.auth0.com/vshttps://your-tenant.us.auth0.com) - Your Auth0 domain is correct and accessible
Inspect your JWT token at jwt.io to check the iss claim.
Problem: The engine rejects JWT tokens with "JWTDecodeException: The token was expected to have 3 parts, but got > 3."
Solution: Verify that:
audienceis set innpl.ymlor passed as an argument in the command line, and exactly matches your API identifier (Applications > APIs > your API > Settings)- Alternatively, set a default audience under Settings > API Authorization Settings > Default Audience
If the audience is not included in the request, Auth0 will return a JWE (JSON Web Encryption) Token. Its payload is
encrypted and consists of 5 parts: HEADER.ENCRYPTED_KEY.INITIALIZATION_VECTOR.CIPHERTEXT.AUTHENTICATION_TAG The engine
expects a JWT Token, which is signed but not encrypted.
Custom Claims Not Appearing in Tokens
Problem: Custom claims are not present in JWT tokens
Solution:
- Verify that your Auth0 Action is enabled and deployed
- Ensure the Action is added to the correct flow (Post-Login)
- Add a log to your Action and verify that it's present in the logs: Monitoring > Action Logs
Problem: The Engine throws a
'R37: Could not resolve party from 'sub=['auth0|subId'], iss=['https://<your-tenant>.us.auth0.com/'][...]
Solution:
- Verify the token includes the correct claims using jwt.io
- Verify that these claims match those declared when the protocol is created
The NPL CLI fails to deploy
Problem: Authentication calls fail with
Authorization exception: Authorization server not configured with default connection.
Solution:
- Go to Settings > API Authorization Settings and verify that
Default Directoryis set toUsername-Password-Authentication
Problem:
Error deploying NPL sources: Engine or authorization service not found athttps://orhttp://localhost:12400. Please check that the service is running, healthy and accessible.
Solution:
- Verify that
ENGINE_MANAGEMENT_HOSTis set to0.0.0.0in your docker compose file
Problem: Authentication fails with Error deploying NPL sources: Unauthorized
Solution:
- Double check the credentials of your user
- Make sure that the URL of
ENGINE_ALLOWED_ISSUERSin yourdocker composefile contains a trailing slash (https://<your-tenant>.us.auth0.com)
Next steps
Now that you have Auth0 configured with the NPL Engine you can: