A secure backend at your fingertips
Ship fast and ship safe, with NPL:
brew install NoumenaDigital/tools/npl && npl init --project-dir my-projectSee other options to Get started, including options without local installation.
How this documentation is organized
What is NPL introduces the technology. Language, Runtime, and Cloud provide progressive detail, organized by technology component. How-To Guides offer practical solutions to common questions.
NPL
NPL is a programming language designed for easily building secure backend services and APIs.
With NPL, you can readily create the server-side logic that powers web and mobile applications. You can focus on implementing business requirements including access control, while the NPL Runtime delivers on key non-functional requirements out of the box.
How does that work?
-
In NPL, authorization is a first-class primitive: Unlike traditional languages where access control is an afterthought or handled externally, NPL bakes it directly into the language and compiler. Specify your authorization logic directly in your code, and the NPL Runtime will enforce it automatically.
-
NPL lets you express more with less code: Keep your business logic and data together, while the NPL Runtime takes care of packaging them as an API service. The NPL Runtime automatically handles data storage and persistence, and a host of additional functional and non-functional requirements.
Here is an NPL snippet with a single protocol - all you need to build a simple document editor with approval workflow:
package document;

@api
protocol[editor, approver] Document(
    var content: Text
) {

    initial state drafted;
    final state approved;

    @api
    permission[editor] edit(newContent: Text) | drafted {
        content = newContent;
    };

    @api
    permission[approver] approve() | drafted {
        become approved;
    };
};
NPL involves protocols, which are objects that encapsulate data and behavior, and permissions, which are actions
that can be performed on protocol instances. Protocols can have multiple permissions, and each permission can be
associated with one or more parties. Parties, such as editor and approver in the example above, are roles that
users can match against to gain access.
NPL is a simple programming language that includes:
-
Enforcement of authorizations: protocol- and permission-level authorization within the language
-
Generation of APIs: protocol- and permission-level REST API generated from your NPL code
-
Persistence of instances: protocol-specific ORM storing all instances upon instantiation and after transactions
We'll examine the NPL snippet through these three lenses further below.
Explore more NPL examples.
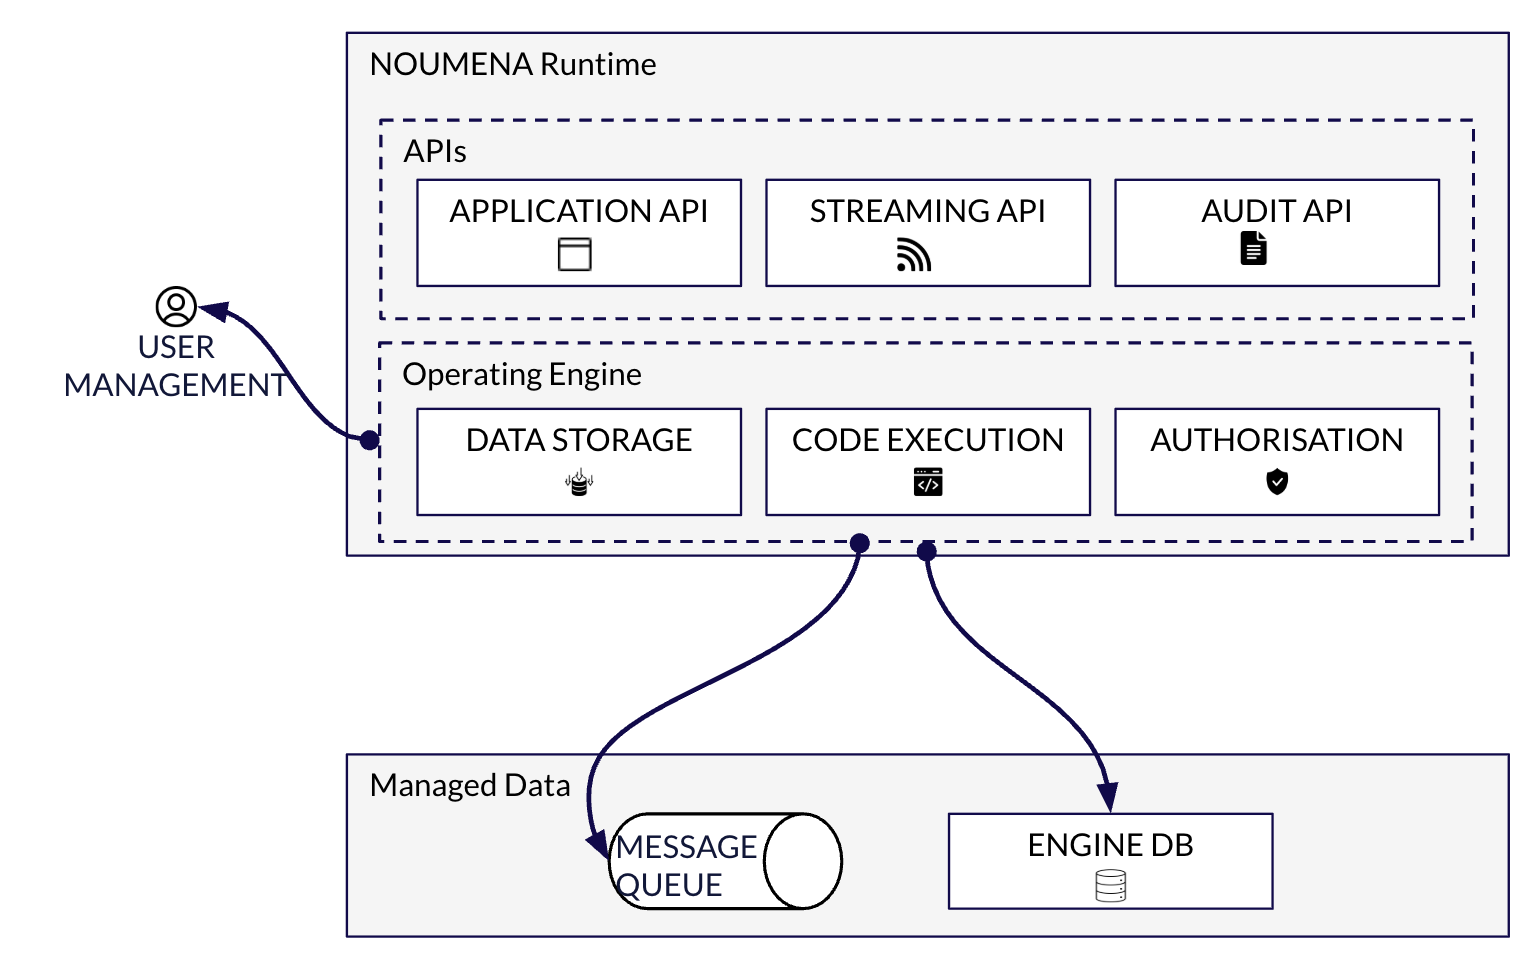
The NPL Runtime
NPL code runs in the NPL Runtime, which provides everything needed for a production backend and can be deployed to any cloud platform or any platform supporting OCI images.
The NPL Runtime is responsible for executing your code securely, processing requests transactionally, enforcing authorization, and persisting resulting instance data.
Check out the Getting started guide and Starter tracks to start using the NPL Runtime.
Authorization
NPL includes an authorization system that allows you to control access to each protocol instance individually. It also allows you to granularly control who can call the protocol's actions.
Within the NPL language, you define parties for each protocol. Parties are protocol-specific roles that are matched to users programmatically. Parties enforce the access to the protocol and the calls to its actions.
Let's analyze the previous NPL protocol:
package demo;

// 1. Party definition for each protocol.
@api
protocol[editor, approver] Document(
    var content: Text
) {

    // 2. Party check on permission call
    @api
    permission[editor] edit() {
        // ...
    }

    @api
    permission[approver] approve() {
        // ...
    };
}-
Party definition for each protocol
editorandapproverparties are defined for theDocumentprotocol. All users matching at least one of the parties can read protocol instances. In general, every protocol has one or more parties. -
Party check on permission call
Each permission is associated with one or more parties. Only users matching the party(s) can call the permission.
-
Party assignment
A set of claims is assigned to each party when the protocol is instantiated. Claims are key-value pairs. Each individual instance of the protocol can have different claims (attribute keys and values) for each party.
Here is a protocol instantiation in NPL. It creates a new
Documentinstance withmy_editorandmy_approverparty values (containing specific claims) assigned to theeditorandapproverparty variables, respectively:function foo(my_editor: Party, my_approver: Party) returns Document -> Document[my_editor, my_approver]("Hello");For example, here are claims that can be assigned to a specific party (say the
editorparty on a givenDocumentprotocol instance):{ "claims": { "role": ["back-office", "process-manager"], "email": ["john.doe@example.com"] } }Within the claims object, any attribute and any number of values can be used to define the party.
-
Party matching
Users need to be matching a protocol party before being granted read access or calling associated permissions. Users are authorized with a token (JWT), and user attributes contained in the token are compared to the claims assigned to protocol (instance) parties to match a party.
In this use-case, users must have the
back-officeorprocess-managerrole and thejohn.doe@example.comemail address to be able to call theeditpermission. These attributes are read from the token, and other attributes are ignored.The closest representation of the party matching is an ABAC (Attribute-Based Access Control) model.
API generation
NPL protocols and permissions are translated into a REST API when the @api annotation is used.
Let's analyze the Document protocol example:
package demo;

// 1. The @api annotation at protocol level
@api
protocol[editor, approver] Document() {

    // 2. The @api annotation at permission level
    @api
    permission[editor] edit() {
        // ...
    }
}-
The @api annotation at protocol level
The @api annotation on the protocol will generate a POST endpoint to create a
Documentinstance. The GET all and GET by id endpoints are generated automatically regardless of the @api annotation. -
The @api annotation at permission level
The @api annotation at permission level will generate a POST endpoint to call the action.
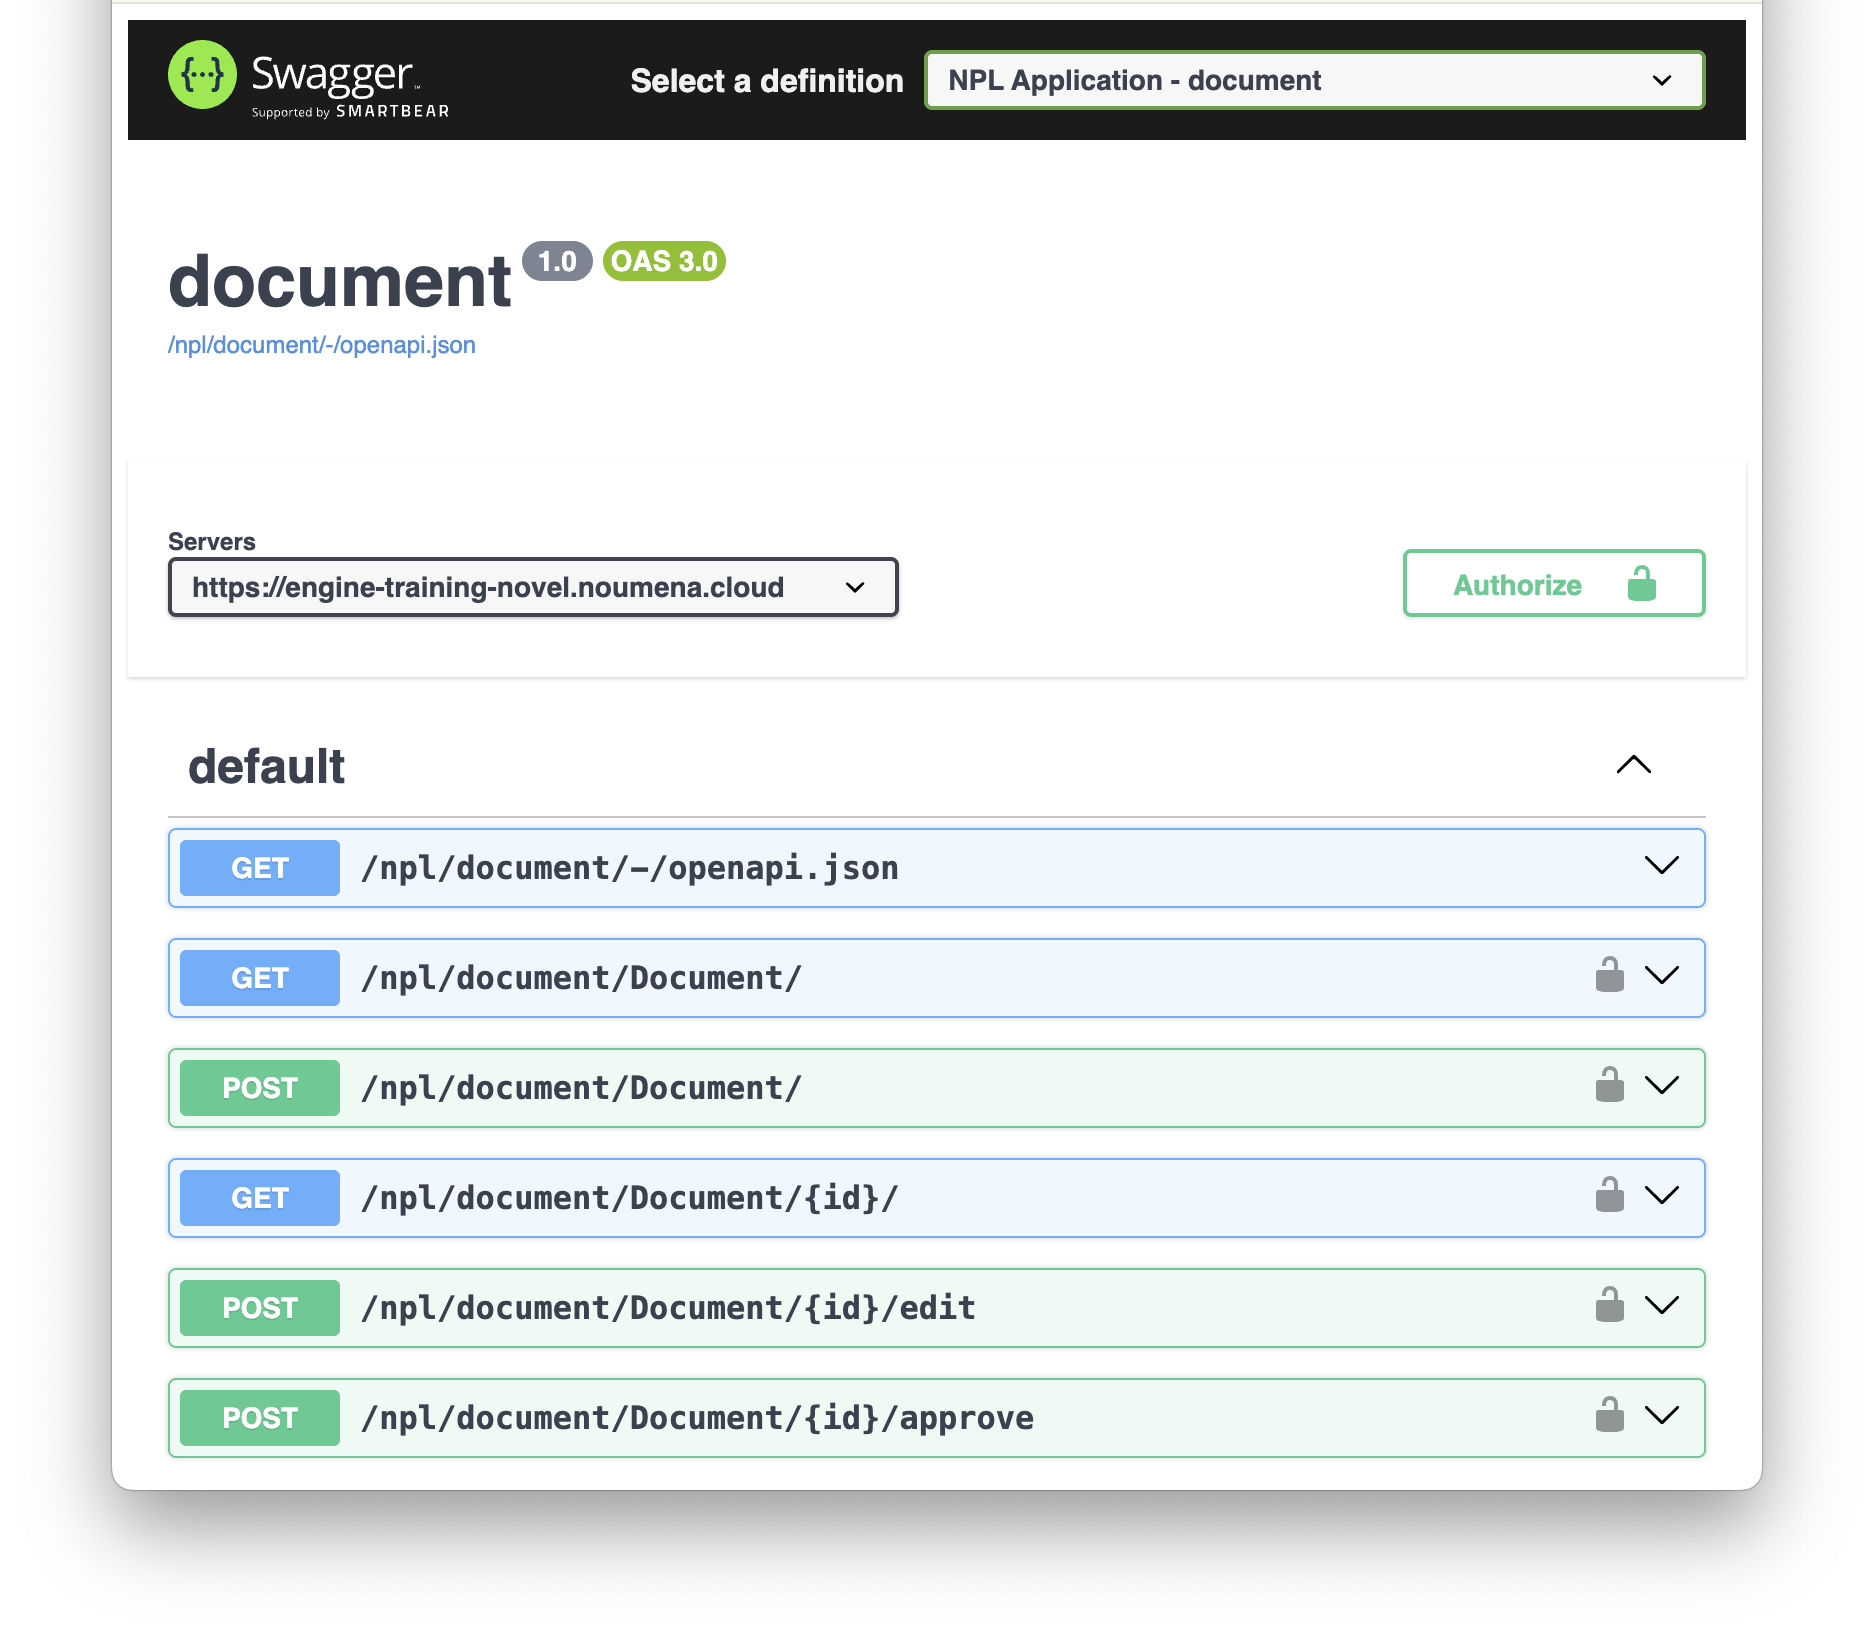
For each declared package, an OpenAPI specification file is generated, and can be used to generate a client in your favorite language.
To easily interact with the API, a Swagger UI is available to create and update protocol instances.
Persistence
Protocol instances and associated data are persisted in a PostgreSQL database upon instantiation and after each permission call from the API. The database schema is managed automatically by the NPL Runtime.
package demo;

// 1. Persistence at protocol instantiation
@api
protocol[editor, approver] Document(
    var title: Text, // stored in database
    name: Text, // not stored in database
    // without the var keyword
) {

    // stored in database
    var content: Text = "Hello " + name;

    // 2. Persistence on completion of call affecting data
    @api
    permission[editor] edit() {
        content = "Bye"; // ...
    }
}-
Persistence at protocol instantiation
Protocol instances are stored in the database upon instantiation. The constructor parameters, protocol fields and parties are stored in the database.
-
Persistence on permission call completion
After each permission call modifying instance data, a new version of the instance is stored in the database. The previous version of the instance is preserved entirely as a historical version for audit purposes. The new versions of several instances modified in a same call are stored transactionally.
If the permission fails, the unmodified version of the protocol instance is preserved as current version.
Data removal for GDPR compliance is supported out of the box. See the GDPR compliance page for more details.
Non-functional benefits
The NPL Runtime provides the following non-functional benefits, out of the box:
- Enforced Authorization
Every interaction is checked against declared access rules at runtime. - Transactional Execution
All operations are fully transactional—either everything succeeds, or nothing does. - Auto-Generated REST APIs
NPL automatically exposes deployed code via REST, so you can integrate without writing boilerplate glue code. - Full Audit Logging
Every protocol instance data change is logged. You get a complete audit trail by default. - Built-in Observability
The NPL Runtime exposes metrics so you can monitor behavior and performance without extra instrumentation.
Further reading
Take your first steps
Check out the Hello World demo to see NPL in action, or the Getting started guide for instructions to get started in no time.